![]() JanetTerra
Sep 24, 2006
JanetTerra
Sep 24, 2006
Menus: The Liberty BASIC Menu Bar
Table of Contents
- NEW
- LOAD
- SAVE
as well as a way to properly exit the program.
- EXIT
Menu Bar
The most common graphical user interface (GUI) menu is the Menu Bar. The menubar appears just below the GUI caption. The menu bar allows users to navigate throughout the program using either keyboard presses or mouse clicks.    |
The Liberty BASIC command for inclusion of a menu bar is, appropriately, MENU . The command line for the above depicted menu is
MENU #main, "Options", "Load", [loadFile], "Save", [saveFile]MENU is case-insensitive , meaning you can write MENU or menu or Menu or any other combination of upper and lower case letters. Menus are defined before the window is opened. The other parameters are
#main , the handle of the window to be opened
"Options" , the menu title visible on the menu bar itself
"Load" , the first listing of the opened menu
[loadFile] , the block of code to be executed if Load is clicked
"Save" , the second listing of the opened menu
[saveFile] the block of code to be executed if Save is clicked
The correct terminology for any separate menu appearing on the menu bar, e.g., Options , is Sub Menu . For the purposes of simplicity, any reference to menu in this article refers to the sub menu . Items which appear in the drop down list when that sub menu is opened are referred to as menu items .
Menus and Window Types
Not all window types support menu bars. Window types that do not support menu bars include dialog windows , toolwindows and popup windows . These windows may support context menus.Menu Listings
 MENU #main, "Menu Title", "1st Listed Item", [BranchTo1], "2nd Listed Item", [BranchTo2], _
 "3rd Listed Item", [BranchTo3], "4th Listed Item", [BranchTo4], "5th Listed Item", _
 [BranchTo5], "6th Listed Item", [BranchTo6], "7th Listed Item", [BranchTo7], "8th Listed Item", _
 [BranchTo8], "9th Listed Item", [BranchTo9], "10th Listed Item", [BranchTo10]
| There is really no limit to the number of listed items a menu can contain. If there are many listings, it may be advisable to use Liberty BASIC's line continuation character , which is the underscore, to break up the listing onto multiple lines. |  |
Multiple Menus
 MENU #main, "File", "1st Listed Item", [BranchTo1], "2nd Listed Item", [BranchTo2]
 MENU #main, "Color", "Color 1", [color1], "Color 2", [color2], "Color 3", [color3]
 MENU #main, "Size", "Small", [sizeSmall], "Medium", [sizeMedium], "Large", [sizeLarge]
 | A window can have more than one menu. The menus appear in the order in which they're defined. |
Menu Separators
MENU #main, "Options", "New", [newFile], "Load", [loadFile], "Save", [saveFile],|, "Exit", [EndProgram]
| Similar menu items can be grouped by inserting a menu separator (horizontal) line. Instead of a listing and its associated branch label, insert a pipe | . |  |
Accelerator or 'Hot Key' Selection
MENU #main, "&File", "&New", [newFile], "&Load", [loadFile], "&Save", [saveFile],|, "E&xit", [EndProgram]
 | The ampersand ( & ) key is a special key when added to any menu title or item. This allows menu selection by keypress rather than mouse click. A menu with the title &File will open when the ALT is kept depressed while the F key is pressed. This key combination is known as ALT-F . The associated alphanumeric key is case-insensitive. Any alphanumeric key can be combined with the ALT key for menu selection. The & character doesn't appear on the menu; instead, the associated alphanumeric key appears underlined when activated. Once the menu has been opened, the ALT is no longer necesssary. Just the letter following the & character needs to be pressed. Often the & precedes the first character in the menu title or item, but that isn't |
Branch Events and Subs
Menu selection directs the code execution to the area specified by the branch label. Copy and paste the following code into your Liberty BASIC editor.NOMAINWINWhen code is directed to branch labels, that complete block of code must end with a WAIT statement. If there is no WAIT statement, code execution will continue through the lines in succession until a WAIT statement is reached, the END statement is reached, or the code encounters an error.
MENU #main, "&Files", "E&xit", [EndProgram]
MENU #main, "Fill &Color", "&1 - White", [fill1], "&2 - Black", [fill2], "&3 - Gray", [fill3]
OPEN "Accelerated 'Hot Keys'" for Graphics as #main
PRINT #main, "TRAPCLOSE [EndProgram]"
WAIT
[fill1]
PRINT #main, "CLS"
PRINT #main, "DOWN"
PRINT #main, "FILL WHITE"
PRINT #main, "FLUSH"
WAIT
[fill2]
PRINT #main, "CLS"
PRINT #main, "DOWN"
PRINT #main, "FILL BLACK"
PRINT #main, "FLUSH"
WAIT
[fill3]
PRINT #main, "CLS"
PRINT #main, "DOWN"
PRINT #main, "FILL LIGHTGRAY"
PRINT #main, "FLUSH"
WAIT
[EndProgram]
CLOSE #main
END
Subs can be used instead of branch labels. Do not insert a WAIT within the subroutine. Just simply END SUB . Unlike mouse events and buttons, menu items do not pass a handle. As such the designated sub will not support this or any parameters. This becomes especially important when subs are being used to exit a program in both the menu and the trapclose statement. Each will need its own unique sub, the menu item sub without a passed handle, and the trapclose sub with a passed handle. The following is the same program as above, but directing selected menu items to subs rather than branch labels.
 NOMAINWIN

 MENU #main, "&Files", "E&xit", EndProgramM
 MENU #main, "Fill &Color", "&1 - White", fill1, "&2 - Black", fill2, "&3 - Gray", fill3

 OPEN "Accelerated 'Hot Keys'" for Graphics as #main
 PRINT #main, "TRAPCLOSE EndProgramT"

 WAIT

 SUB fill1
 PRINT #main, "CLS"
 PRINT #main, "DOWN"
 PRINT #main, "FILL WHITE"
 PRINT #main, "FLUSH"
 END SUB

 SUB fill2
 PRINT #main, "CLS"
 PRINT #main, "DOWN"
 PRINT #main, "FILL BLACK"
 PRINT #main, "FLUSH"
 END SUB

 SUB fill3
 PRINT #main, "CLS"
 PRINT #main, "DOWN"
 PRINT #main, "FILL LIGHTGRAY"
 PRINT #main, "FLUSH"
 END SUB

 SUB EndProgramM
 CALL EndProgramT "#main"
 END SUB

 SUB EndProgramT handle$
 CLOSE #handle$
 END SUB
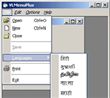
The Texteditor Menus

Windows opened for Text automatically include two special menus: Files and Edit. Each additional menu placed by the coder will force these two automatic menus one position to the right.
Code for the left and center images above
 OPEN "The Texteditor Menus" for Text as #main
 PRINT #main, "!Trapclose [EndProgram]"

 WAIT

 [EndProgram]
 CLOSE #main
 END
Code for the right image above
MENU #main, "&Styles", "Style &1", [style1], "Style &2", [style2]Opening a regular window with an embedded texteditor will remove the automatic Files menu while retaining the automatic Edit menu. For a more comprehensive discussion of manipulating the texteditor's automatic Edit menu, see Texteditors with Eddie.
OPEN "The Texteditor Menus" for Text as #main
PRINT #main, "!Trapclose [EndProgram]"
WAIT
[EndProgram]
CLOSE #main
END
Other Types of Menus
Menus on the menu bar are not the only types of menus used in programs. Liberty BASIC supports context menus , also known as popup menus . The placement of the popup menu is dependent upon the placement of the mouse cursor. A tutorial for Popup Menus is in the planning stages but not yet available. Stay tuned.A custom menu gaining popularity is the Pie Menu. Custom menus can be easily coded into your Liberty BASIC program using a Dialog_Modal window that contains a graphicbox .
More complex menus such as cascading menus, folding menus, menus with bitmaps, etc., require knowledge of API and DLL calls.||
If you have a Pie Menu or other custom menu you'd like to share, please consider submitting an article.